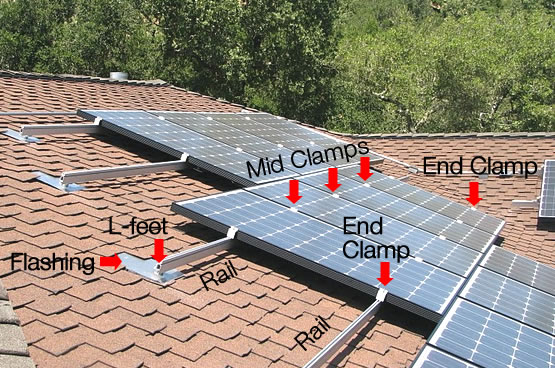
Some of the most important questions for most installers and DIY solar enthusiasts concern mounting solar panels. There are many high-quality mounting solutions on the market, such as Unirac, IronRidge, PowerFab, Quickmount PV, Schletter, etc. By way of example, we'll go over the materials required for a given application using the Unirac SolarMount racking system.
A simple roof mounting system may require the following items:
- Rails (to provide a platform for mounting the modules)
- Splices (to connect rails as needed)
- Mid clamps (to be located between each module)
- End clamps (to secure the end of last module)
- L-feet or standoff (to secure the rail to the roof)
- Flashing (to prevent water leakage)
- Grounding lugs (to run the grounding wire)
- Grounding clips (to create grounding paths for modules through rails)
A helpful resource can be found in the Unirac Master Component List, which contains product numbers that can be useful when compiling the bill of materials.
1) Estimating the Rail Size (Unirac Master List page 12)
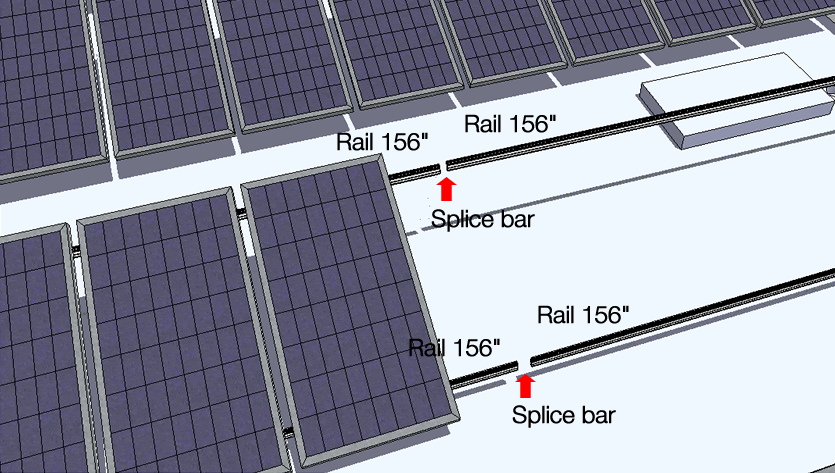
To begin you will need to know how many modules will be placed in each row. You should also determine the dimensions of each module and the orientation of the panels (portrait or landscape). Please refer to the modules oriented in portrait as seen on the image below.

To estimate total rail size, simply multiply the module width (if in portrait, or the module length if in landscape) by the number of modules in a row. Then add one inch between each module and two inches at each end of the modules for the mid and end clamps, respectively.
In the present case, installing nine 31.4-inch modules in one row requires 282.6 inches of rail. Adding eight inches for mid-clamps and two inches for end-clamps results in a minimum of 294.6 inches of rail.
Going back to the Unirac Master Component List, you can see that rails come in predetermined lengths. I will connect two smaller rails to create the needed length via a splice (See Splices in section 2). The 156-inch SolarMount rail (part number 300011) is my best bet.
Each row of modules requires two rails (top and bottom). This system, which has two rows of modules, requires four rails. Further, since I will be splicing two 156" rails in order to reach the required 294.6" rail length, I will need a total of eight 156" rails.
2) Splices (Unirac Master List page 16)
In order to connect two 156" rails (to achieve the total required length), I need to use one splice splice bar. I need a total of four splice bars (one for each splice point between eight rails).

3) Mid Clamps (Unirac Master List page 20)
The number of end clamps required is equal to one less than the number of modules on each row. For nine modules, I need eight mid-clamps for each rail. As I have four rails, I need 32 mid-clamps.
The module thickness is also important here. Since my module thickness is 1.82", I use F type mid and end clamps, which are applicable for modules between 1.77" and 1.85". Please refer to the Unirac Master List, pages 6 to 8 or pages 20 to 22, to determine the size you will need to use.
Note: You may prefer to use bottom mounting clips instead of mid and end clamps. Bottom clips are cheaper, but more difficult to install in large systems.
4) End clamps (Unirac master list page 20)
Four are required for each row, as end clamps will be attached to the ends of each rail. In my case, I need eight end clamps for the rows in this array.
5) L-feet or standoffs (Unirac master list page 44-45)
L-feet and standoffs are the parts that connect your rail to the roof. The number of L-feet depends on how sturdy of a system you need. In conditions where there is no significant snow load or high wind speed, L-feet spacing of 5 ft or closer can be necessary. The harsher the conditions, the more L-feet connections and roof penetrations are required. In order to keep roof penetrations to a minimum, heavy-duty rails are available, which allow for longer spans.
For my system, I am using a 5 ft rail span, necessitating at least six L-feet for every 294-inch length of rail. As I have four rails, I need 24 L-feet.
If you prefer to use standoffs instead of L-feet, the same calculation is required.
6) Flashings
The number of flashings needed is generally equal to the number of L-feet/standoffs required. In the specified L-feet system, I prefer to use QuickMount PV flashing solutions. It's likely best to use Unirac flashing with Unirac standoffs.
7) Grounding Clips (Unirac Master list page 17)
Order one grounding clip for every two top mounting clamps (mid-plus end clamps). Only one of the two rails in each array row requires grounding clips.
My system needs 32 mid-clamps and 8 end-clamps. Thus, I need 20 (40/2) grounding clips (two 10-packs of item number 980005).
8) Grounding Lugs (Unirac Master list page 17)
I will order one lug for each rail span and two for each rail splice. Since I need two grounding lugs for each splice in my system and four splices on four rows, I will need a total of 12 grounding lugs. Grounding lugs come in packs of ten, so I will order two packages of part number 980011.
Once you know the part numbers that you need, the best way to acquire such products is to contact a Greentech Renewables representative and ask for a quote.
Comments
Very helpful article, Thanks!
Great article. Question. If you use a splice bar to connect two rails, is it required that you add a grounding lug for both rails that you connect or will the splice bar allow a single grounding lug to ground the full spliced rail ? In addition, when do you need to use jumpers between rails with the splice to ensure grounding? Thanks for the help on this.
Jeff,
Yes, you'd use two grounding lugs for each splice.
The purpose of the lugs is to maintain electrical conductivity across the splice. A splice is not considered a grounding conductor since it is exposed to air and water.
With the lugs in place, a bare copper wire of the appropriate size (usually #10) can be installed between them to span the splice and ensure conductivity.
In the case of very long runs, a splice is rigidly attached to only one rail, and allows the rails to expand and contract in line with each other over temperature fluctuations. Again, the bonding jumper "jumps" the sliding splice and maintains conductivity.
Thanks. Do you recommend any pre-made bonding jumpers? Who makes jumpers?
Wiley Electronics makes WEEB Bonding Jumpers. They also have some inexpensive alternatives for grounding lugs.
Any suggestions for flashing to use when installing solar on a flat roof vs. a pitched roof? Will the QuickMount flashing work on a flat roof?
Mg,
At this time, Quickmount doesn't make a flat roof mounting solution.
For solar installations on flat roofs, you can use Unirac FastFoot for which you can also buy the flashing.
Thanks for these comments. I did find this image from Unirac showing Solarmount on a flat roof. As you can see they used the tilt legs but did not using flashing for this installation. Is flashing required for a flat roof?
A flashing may not be required. Let's just limit this discussion to the very common tar and gravel roof for now, since roof weatherproofing is deserving of an entire article or thread of its own.
If a stand-off is used on a flat roof without a flashing, it will pull the surrounding roof decking material down as it is tightened into the rafter below. This creates a low spot in the deck that will tend to collect water. The back and forth movement of the stand-off due to wind, vibration or thermal movement of the racking will eventually crack the sealant around the base of the stand-off and allow water to flow in - especially after UV light has dried out the sealant.
The flashing creates a high spot in the roof that surrounds the stand off. The flashing is also sealed to the roof deck with the roofing material and if done correctly doesn't't move with the structure above it. When a stand-off is used, there should always be a flashing.
On some roofs it's possible to use a hanger bolt to mount the solar racking. The hanger bolt is a single threaded shaft that passes through the roof deck and waterproofing to embed in the rafter. It should not compress the roofing material or deck.
The hanger bolt can then be sealed with a high quality built-up sealant which is then protected by additional roof gravel.
WARNING: This can only be done on a well-designed roof. No flat roof should actually be flat. There needs to be enough pitch to prevent standing water. If the drainage characteristics of a flat roof aren't known, then always assume the worst and use a minimum of 4" of flashing around a stand-off or a hanger bolt.
This is a clear and useful explanation of what the jumpers are actually doing and why we use them. Thanks.
Regards,
Edwards - online colleges
Samuel,